I don’t really import VMs via OVA to my hypervisor. I tend to install from the ISO file. With the COVID-19 quarantine going on, I thought it would be a best time to learn Red Hat and may attempt to take the RHCSA 8 exam. To do this, I would need a lab. The quickest way would be to import a VM to my Proxmox box.
I used to scp upload the .ova file to Proxmox and extracted the contents of the .ova file; qemu convert the .vmdk file into .qcow2 then dd the .qcow2 file to the blank VM. The blank VM need to be created in the web UI prior to dd. I recently found out that importing a .ova file to Proxmox got easier via the qm importovf command. Like I mentioned a minute ago, I don’t import VM that often; this post is to document how import an OVA file to Proxmox.
The command is very simple.
qm importovf <vm-id> <ovf-file> <storage-name>
Let’s setup the environment for this post.
- Proxmox server – 192.168.7.32
- OVA file – librenms-ubuntu-18.04-amd64.ova
- VM ID – 333
Upload the OVA file to the Proxmox server. I’ll be using SCP.
scp librenms-ubuntu-18.04-amd64.ova [email protected]:/root/
Extract the contents of the OVA file. The content that we need here is the .ovf file.
root@pve1:~# tar xvf librenms-ubuntu-18.04-amd64.ova
root@pve1:~# ls -l
total 3208652
-rw-rw---- 1 games bin  1642814976 Nov  3 07:25 librenms-ubuntu-18.04-amd64-disk001.vmdk
-rw-r----- 1 games bin         173 Nov  3 07:27 librenms-ubuntu-18.04-amd64.mf
-rw-r--r-- 1 root  root 1642824192 Nov  3 07:28 librenms-ubuntu-18.04-amd64.ova
-rw-r----- 1 games bin        6690 Nov  3 07:25 librenms-ubuntu-18.04-amd64.ovf
Once the .ovf file has been extracted from the .ova file, we need to execute the qm command.
qm importovf 333 librenms-ubuntu-18.04-amd64.ovf pve1_local_zfs
What is about to happen here is Proxmox will read the .ovf file and will create the VM based on the .ovf file information. Proxmox will assign the VM-ID of 333 to the VM and put the VM in pve1_local_zfs.
The new VM with VM-ID of 333 should show up in the web UI. Hope you’ll find this useful.
Cheers!
Here is an update to this post: (I changed the original VM ID from 304 to 333 to reflect the screenshots)
If you get an error as shown in the snippet below, the VM configuration will still get imported to Proxmox, but without a disk. We would need to import the vmdk disk that came with the OVA file.
warning: unable to parse the VM name in this OVF manifest, generating a default value
invalid host ressource /disk/vmdisk1, skipping
To import the VMDK file can be done two ways: Import the converted version or use the option --format. The easier way would be to use the –format option followed by the desired format which is qcow2 as shown below. The format options are raw, qcow2 and vmdk.
root@pve1:~# qm importdisk 333 librenms-ubuntu-18.04-amd64-disk001.vmdk pve1_local_zfs --format qcow2
Another way of importing a disk is converting the vmdk file into qcow2 format.
# Convert the vmdk file to qcow2
root@pve1:~# qemu-img convert -f vmdk -O qcow2 librenms-ubuntu-18.04-amd64-disk001.vmdk librenms-ubuntu-18.04-amd64-disk001.qcow2

# Import the disk into the VM
root@pve1:~# qm importdisk 333 librenms-ubuntu-18.04-amd64-disk001.vmdk pve1_local_zfs
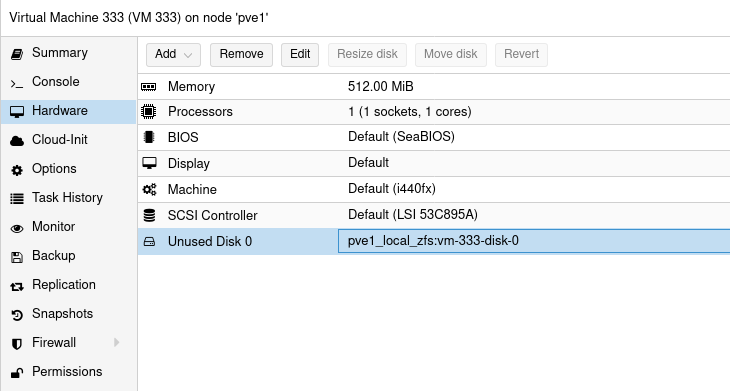
Either methods would accomplish the task. Once done, navigate back to the web UI and edit the VM’s Hardware > Unused Disk 0 (as shown in Figure 1) and change the Bus/Device from IDE to either SATA, VirtIO or iSCSI.

The name Unused Disk 0 will change to Hard Disk as shown in Figure 2.

While the VM is powered down, might as well change its name from VM333 to something that make sense. This can be done in VM’s Options > Name
Cheers!

After executing qm importovf 304 librenms-ubuntu-18.04-amd64.ovf pve1_local_zfs, I get the following message:
warning: unable to parse the VM name in this OVF manifest, generating a default value
invalid host ressource /disk/vmdisk1, skipping
Did I miss a step? I am using Proxmox V 6.2-4.
Hello Roger, I don’t think you miss a step. It is one of those instances that doesn’t work out of the box. I put this in a lab and got the same results as you. I got it working by executing two more commands. At this point, you should have the VM showing up in the web UI. Make sure this VM is powered down. When you tar extract the .ova file, there should be a .vmdk file. Convert the vmdk to qcow2. qemu-img convert -f vmdk -O qcow2 librenms-ubuntu-18.04-amd64-disk001.vmdk librenms-ubuntu-18.04-amd64-disk001.qcow2 After converting to qcow2, import the disk into the… Read more »
I updated the post to address the issue. Also, you can use the –format in importdisk command as well
Karlo,
Your update worked just fine. Thanks a lot. Now I am trying to connect to my network. I added the Network Device and it is not working. I tried ping my router and it says Network is unreachable.
Do I have manually have to configure the network?
You have to double check, but I think, you need to add a Network Device to the VM. Go to Hardware > Add > Network Device.
I figured it out. Thanks.
I got erorr
storage ‘local_hithm_zfs’ does not exist
Is the ‘local_hithm_zfs’ showing up in
zpool listoutput?If it does, make sure the Disk image has been added to its content in the Datacenter > Storage.
Great article! After importing the VM and starting it I got an error: Unable to find lvm volume and dropped to initram I fixed it this way: vgchange -a y It should report something like 2 logical volume(s) in volume group xxx now active Then exit It should boot up normally. Login and then sudo nano /etc/default/grub Modify this line to look something like this GRUB_CMDLINE_LINUX=”rootdelay=5” That is the time in seconds the boot process will wait until all disks are ready, you can try a lower value for faster startup. In some cases 0.5 is enough, I had luck… Read more »