Here is an update : Nextcloud Docker container
I have been using Nextcloud since 2017 on my Unraid server using the Linuxserver Docker image. It works, but I have a major issue with it. I could not get my instance of Nextcloud upgraded to the latest stable. I started with version 12 and got it upgraded to version 14. Version 14 is the highest I can get my Nextcloud instance. Usually, upgrading the Linuxserver Docker containers is a matter of pulling a new image. However, the Nextcloud image is an exception. The Nextcloud image needs to be upgraded within the container. Here is the thread from Unraid forum in regards to upgrading the Linuxserver Nextcloud Docker container.
I am switching my Nextcloud instance from Linuxserver Nextcloud Docker image to TurnKey Linux Nextcloud LXC container. I will be using NFS from my NAS for the /data as shown in Figure 1. I also need to expose my Nextcloud to the Internet so that I can access my server anywhere. This is going to be behind an NGINX reverse proxy.

I am assuming that you have the following services in placed.
- A reverse-proxy server such an NGINX
- Valid certificate (Lets Encrypt)
- A domain
Since I am going to be using my NAS to store my Nextcloud data as shown in Figure 1, I need to add the NFS share to Proxmox, so that the LXC can mount the bind point. The steps below are the things I am going to implement to accomplish my goal.
- Add the NFS share as a storage in Proxmox
- Download the TurnKey Linux Nextcloud template
- Create the Nextcloud container using the TurnKey Linux Nextcloud template
- Modify the container’s <container-id>.conf file to bind the mount point
- Setup the NGINX server block
- Adjust the PHP file based on my settings
- Configure Nextcloud
- Create a new admin account
Let’s go through the laundry list above. We are going to do this in order from 1 through 8.
- Login to Proxmox web UI and navigate to Datacenter > Storage
- Click Add then select NFS
- In the ID field, give the storage that can be easily identify
- In the Server field, enter the IP address of the NFS server
- In the Export field, enter the absolute path of the NFS export
- In the Content field, deselect the Disk Image and select the Container

Let’s download the TKL Nextcloud template using the Proxmox web UI
- Expand your PVE node and navigate to the storage where you keep the container templates/ISO
- Select Content then Templates
- Search for “nextcloud“
- Select the turnkey-nextcloud
- Click Download

Once the template has been downloaded, we can create the Nextcloud container.
- Click on the button in the upper right corner Create CT

- Make sure under the General tab, the Unprivileged is marked as shown in Figure 4
- Click Next
- Under the Template tab, select the storage where we downloaded the TKL Nextcloud template
- Find the debian-10-turnkey-nextcloud_16.0-1_amd64.tar.gz and select it
- Click Next when done
- Under the Root Disk tab, adjust based on your parameters
- Click Next
- Under the CPU and Memory tabs, set it based on your needs
- Click Next
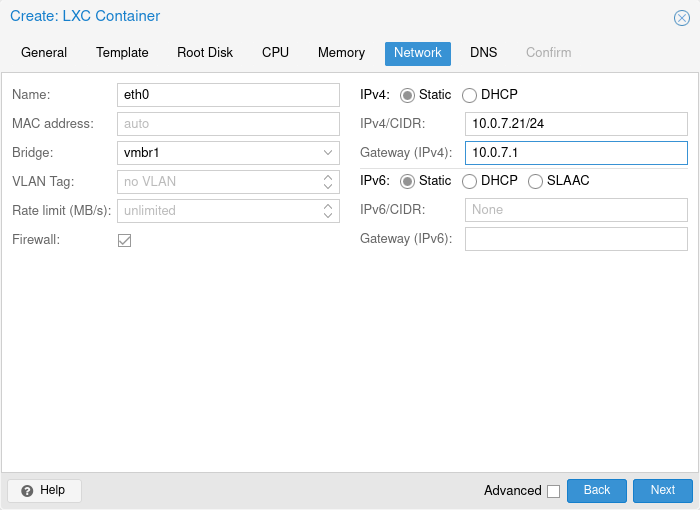
- Under the Network tab, configure your network based on your environment
- Click Next
- Under the Confirm tab, do not select Start after created box
- Click Finish


Before starting the container, we need to modify the LXC container .conf file that is located in /etc/pve/lxc/. Navigate to PVE node and select Shell to access the node’s terminal. Before modifying the .conf file, we need to get the path of the NFS export we added earlier. Navigate to the directory /etc/pve/ and cat the storage.cfg.
# Navigate to where the storage.cfg is
cd /etc/pve/

# We need to find the ID  and its path. This will print
# the information we need which is the path
# "/mnt/pve/tower_cloud"
grep "tower_cloud" storage.cfg -A 4

Once we get the path to the NFS storage, we need to modify the Nextcloud container .conf file. The .conf file is located in /etc/pve/lxc/. We need to add a line to the .conf file. However, we need to identify which one is our Nextcloud container. Each container in /etc/pve/lxc/ is labeled by its CT ID. So back to Figure 4, my CT ID is 109. Therefore, the file that I need to edit is the 109.conf.
My NFS export is /mnt/user/Cloud from my NAS. However, my target directory is a subdirectory in my NFS export which is /mnt/user/Cloud/nextcloud_lxc. Therefore, I added the subfolder to my path.
# To add the mountpoint to the 109.conf
# pct set <ct-id> --mp0 <source-path>,mp=<destination-path>
pct set 109 --mp0 /mnt/pve/tower_cloud/nextcloud_lxc,mp=/var/www/nextcloud/data
Now that the NFS storage has been mounted we can start working on the Nextcloud container. Before powering on the Nextcloud container, we need to configure our NGINX to point it to our subdomain.
I am using NGINX as my reverse-proxy so that I can access my resources securely from outside of my network. Below is the server block.
server {
    listen 443 ssl;
    listen [::]:443 ssl;

    server_name nextcloud.*;

    include /config/nginx/ssl.conf;

    client_max_body_size 0;

    location / {
        include /config/nginx/proxy.conf;
        resolver 127.0.0.11 valid=30s;
        set $upstream_app nextcloud;
        set $upstream_port 443;
        set $upstream_proto https;
        proxy_pass https://10.0.7.21/;

        proxy_max_temp_file_size 2048m;
    }
}
Now, we need to power on the Nextcloud TurnKey container. Navigate to CT’s Console and login as root user.
- Enter the MySQL password for Adminer which is the frontend for MySQL
- Enter the password for the Nextcloud admin account
- Enter the domain
- It is up to you if you want to use the TKL services, but I skipped mine
- It is up to you if you want TKL notifications. I skipped mine
- Install the security updates
- The page is the appliance services. Do not go to http://<ip-address> yet to initialize Nextcloud. Click on Advanced Menu
- Select Quit to enter the terminal


Once we are in the terminal, navigate to /var/www/nextcloud/config/. Just in case, make a backup of the config.php.
cd /var/www/nextcloud/config/

# Make a backup of config.php
cp config.php config.php.bak
Now we need to edit the config.php file. We need to replace and add couple of lines. Adjust the value based on your use case.
- Replace the line
0 => 'localhost'with the correct IP address0 => '10.0.7.21' - Replace the line
'overwrite.cli.url' => 'http://localhost',with your own domain'overwrite.cli.url' => 'https://nextcloud.networkshinobi.com', - Add the following line:
'overwritehost' => 'nextcloud.networkshinobi.com', - Add the following line:
'overwriteprotocol' => 'https',
The config.php file should look something similar to below
<?php
$CONFIG = array (
  'passwordsalt' => 'OPIju1935706jhaliuoiejlo*&po;',
  'secret' => '79df369621cafe8e85ba7a8cf6d794asdi23498uoidhjaoic01ae333f3cfe176198uwke42,
  'trusted_domains' =>
  array (
    0 => 'localhost',
1 => 'nextcloud.networkshinobi.com',
  ),
  'datadirectory' => '/var/www/nextcloud/data',
  'dbtype' => 'mysql',
  'version' => '18.0.4.2',
  'overwrite.cli.url' => 'https://nextcloud.networkshinobi.com',
  'overwritehost' => 'nextcloud.networkshinobi.com',
  'overwriteprotocol' => 'https',
  'dbname' => 'nextcloud',
  'dbhost' => 'localhost',
  'dbport' => '',
  'dbtableprefix' => 'oc_',
  'mysql.utf8mb4' => true,
  'dbuser' => 'nextcloud',
  'dbpassword' => 'Ohnskie2aaasljeoia87be3ak74sy8732qydiuhf',
  'installed' => true,
  'memcache.local' => '\\OC\\Memcache\\Redis',
  'redis' =>
  array (
    'host' => '/var/run/redis/redis.sock',
    'port' => 0,
    'timeout' => 0.0,
  ),
  'filelocking.enabled' => true,
  'memcache.locking' => '\\OC\\Memcache\\Redis',
  'instanceid' => '92fa8123425269u',
);
In addition to editing the config.php file, we need to change the owner of the nextcloud directory and add the .ocdata to the data directory.
- Make sure to add the file .ocdata in the root of the NFS share; otherwise, you will get an error as shown in Figure 20.
- Change the owner of the directory
/var/www/nextcloudtowww-data
# Add the .ocdata file in the root of the data directory
touch /var/www/nextcloud/data/.ocdata

# Change the directory owner
chown -R www-data:www-data /var/www/nextcloud

At this point, the Nextcloud LXC container should be configured. Open a web-browser and navigate to the IP address or the subdomain of the LXC container. If everything goes well, you should get the login prompt. Login to Nextcloud using the “admin” account that was created in Figure 13.
- We will create a new admin
- Delete the TKL admin account
Let’s create a new admin account. Login to the nextcloud web UI. https://<sub.domain.com> using the TKL admin account. Then navigate to upper right corner and click on the admin account. Click on Users.
Click on New user and give it a new name and a password. Make sure that select admin from the group to add the new user to the admin group. When done, click on the blue button then logout.

Login as the new admin. Then go back to the new admin account then select Users. From here, delete the original admin account as shown in Figure 22 and start using the new admin account.

One last thing, the default timezone is UTC. There is nothing wrong about UTC and most system preferred UTC. If it bothers you, the command to change the timezone is dpkg-reconfigure tzdata.
That’s about it. Cheers!
When you boot up the turnkey container, mine did not display the blue screen with all the questions. How do I run setup inside the container?
(edit)
Found it, just type in ‘turnkey-init’ at the prompt inside the container
Hey, thanks for the article. This is exactly what I am trying to do. I’m running into trouble with the nginx reverse proxy, with 502 bad gateway errors so any help is appreciated. I’m also a noob at all this, so please go easy on me 🙂 Here is my setup. Nextcloud LXC is on 192.168.1.50 and my nginx runs in a separate LXC in 192.168.1.17. When the request hits nginx, I need to forward it to 192.168.1.50 right. So, here goes. Add 192.168.1.17 to the trusted_hosts list in nextcloud’s config.php. How do i set the overwrite.cli/host/protocol then? Do I… Read more »
I am still learning NGINX and trying to improve the config whenever I get time. You can probably check the nginx log /var/log/nginx/error.log.
1. You can
2. Yes
3. I am using the Linuxserver SWAG container. The ssl.conf contains the SSL config and the proxy.conf contains the proxy configuration.
4. I believe that is for Docker container use. You can comment it out and it is still going to work.
Great, thanks for the reply. I’ll look into the SWAG container. It might simplify my life. 🙂
Looking forward to more posts on your blog
terrific job, thanks!
This is.a really useful guide but i am not sure i am following it to the letter. I have got the install working, but i am limited to the size of the root disk that i set, yours being 10Gb in the figure 6. I want to install a root disk but have the data disk on the NFS drive, i have tried moving it by mounting the NFS in FSTAB and copying and moving the data drive (and routing in config.php) but it wouldnt work. Are you able to expand the guide a little ?
My root disk is taking about 2.5GB out of the 10GB I provisioned in Figure 6. If you are using the LXC, you don’t modify the fstab at all to mount the nfs.
To mount the nfs, you need to run this command:
pct setct-id--mp0nfs-export,mp=mount-pointThanks for quick response. i used the PCT set command and it puts the container on the NFS drive but my storage for data directory on nextcloud is limited to the size of the container i selected in root drive (10Gb). i want to use my full NFS drive (6TB DLink 320 NAS) to host the data directory from nextcloud. there are some instructions out there about moving the data directory, but i cant seem to get any to work. I presume i could just set the disk size to 4T or something, but i would like the files to… Read more »
I am a bit confused. If you used the
pct setyour data should not be limited to the size of the container (10GB) since your NAS is 6TB.You will know this if you use the command
df -hand you will see the NFS share is mounted.I am just wondering, did you mount your 6TB DLink 320 NAS on Proxmox via the Datacenter > Storage?
Thank you so much, i’m noob with low english skill and that was a great help :3 I will share what i did to finally get my server without warning etc after 2 day of headhache on my proxmox 🙂 On my reverse proxy (nginx) to have a valid certificate and working redirection (i’m totally noob with NGINX, don’t understand all but it work well for me..) : # certbot –nginx –agree-tos –redirect –hsts –staple-ocsp –email [email protected] -d nextcloud.mydomain.com # vi /etc/nginx/conf.d/nextcloud.conf nexcloud.conf : — server_tokens off; server { listen 80; listen [::]:80; server_name nextcloud.mydomain.com; return 404; } server { server_name nextcloud.mydomain.com;… Read more »
Hi! Tahnk you very much for this turorial, this is exactly what i was looking for. However i cant seem to make the NFS MountPoint going to work. I can add my Synology NFS Share to the proxmox Host, i can add/delete files in that share and everything works. When i try to create an unprivileged CT, the NFS mountpoint does not work at all. I then tried creating it as a privileged CT and put the mountpoint in it but it seems that the turnkey nextcloud installation is creating an /var/www/nextcloud-data folder and puts the ../admin, ../nextcloud.log and so… Read more »
What do you mean the NFS mountpoint does not work? Within the container, do you see the NFS mounted when you execute the
dfcommand?Yes, i can see the mount as it self, but it seems that my permissions are not right. When i ls -l the directory /var/www/nextcloud/, all the folders have www-data as the owner, except the folder data, which i mounted. It is with green background in the ls -l listing and has the owner ‘nobody’ and group ‘nogroup’. I tried your command chown -R but it says ‘operation not permitted’ on that data folder. When i open my Synology NAS to check the rights, i tried all squash-possibilities and gave rights to the Proxmox Host IP and Container IP but… Read more »
For the Nextcloud to work, the www-data must have write access to the directory. Make sure that on the Synology NAS that it allows www-data to write to the NFS directory. Have you seem this https://www.reddit.com/r/synology/comments/i95mal/mounting_a_nfs_share_from_synology_to_linux_howto/?
were you able to fix it?having similar issue!
Thank you for this write up. I had searched several months ago for a concise Proxmox-TKL-NextCloud guide. I was able to get this working using the host name of my local server. I do not have an NGINX proxy. Instead I used my router (an EdgeRouter X) and skipped certificates. However, if I try to set it up with an FQDN like you have, I am unable to bring up the login page. I get an ERR_CONNECTION_REFUSED. I have tried so many configurations, I could not tell you. I can still ping the NextCloud server by host name or FQDN… Read more »
thanks for creating that guide …..I have not converted my existing nextcloud setup (currently done via docker on an omv server) but I like to move to proxmox to have more flexibility. My idea is to have omv running in a vm on proxmox and use nfs (or cifs) as well to let nextcloud use the data as well as others. About NFS I am wondering in generall if it would be easier to do a nfs mount inside the container rather then mounting it on the host and then doing a mount bind point thing. Of course a nfs… Read more »
I tried to mount the NFS storage directly to the container, but it would not let me. I had to mount the NFS storage to the host then mount bind it.
I am playing around on a test pve and for me it looks like that actually there is no need to edit the 100.cfg or whatever number file but the line according to your guide needs to get added to the .cfg file (the way I read it) is actually a command which will modify the cfg file if exectuted in the pve shell: pct set 109 –mp0 /mnt/pve/tower_cloud/nextcloud_lxc,mp=/var/www/nextcloud/data
The cfg file then gets a line like mp0: ….
Just wondering if i misunderstood the guide of if there are different ways to do the same.
You just need to grab the host’s NFS path from the
storage.cfg. The path in question is the NFS that was mounted on the host. That is the path that you would use in thepct setcommandSo I’m going to try using the same imager, a question I have is how do you update the image? With docker I just place the config and data outside but I’m not sure about LXCs.
This is from TKL https://www.turnkeylinux.org/docs/appliance-upgrade
Thanks for the detailed article (will have to go over it again).
I’m planning on running NextCloud in an LXC on Proxmox, so this is helpful (I’ve tried in the past but had some issues with getting it going).
Question: Why the NFS server for Nextcloud? Why not access the mount directly from Nextcloud (through a bind mount)? Is this for security reasons?
Thanks again
Hi,
In LXC, the bind mount is done through the host. I found the official Docker container from Nextcloud to be a much easier to manage and upgrade, so far it is going great for me. If everytyhing goes well with this container, I might permanently switch to the official container.
When you say official container are you refering to this above LXC container? If not please share what steps are different than this guide.
Alos, i found in teh current lxc the directory is /var/www/nexcloud-data and not nextcloud/data
FYI – in my setup (like above) my update failed at ‘creating backup’. Dont know why
The offical container I mentioned was the one from Nextcloud team which is this https://hub.docker.com/_/nextcloud
My disk now show the shared volume and capacity but any file i drop simply goes to the lxc vm disk of 32 GB instead of using the mount folder! what could be wrong?
Make sure the NFS is mounted correctly.
Thank you very much for the detailed installation procedure. As I use Apache2, instead of Ngnix, reverse proxy with letsencrypt SSL, I have to amend /etc/apache2/sites-avaliable/nextcloud.conf in nextcould root console. The nextcould container, by default, uses Apache2 for HTTP redirection to https with self-signed certificate. The revised nextcloud.conf looks like belows. Basically, I comment out the whole Virtualhost 443 section and Directory section, and add DocumentRoot in Virtualhost 80. After restart the container, the local access to nextcloud becomes HTTP protocol, and thus I can use normal Apache2 reverse proxy to gain authorized ssl/https access to nextcloud. ServerName localhost <VirtualHost… Read more »
Disabling https like above has negative effect on Nextcloud app on Android. I can’t sign in. It seems Nextcloud newer versions plant https as necessary in many parts of the software, which is a good thing.
I’m later able to make Apache reverse proxy, with letsencrypt, work with Nextcloud self-signed https as shown in another comment of mine.
As I used Apache2 reverse proxy, not ngnix. Below is the reverse proxy part that works
Just to add to the above post that I didn’t show the other part of apache reverse proxy serup which specifies virtual host port 80 and 443 with letsencrypt key directory set up because they are the preliminary set up which must be there to support any additional virtual host we add, in this case, Nextcloud.
Hello!
Thank you very much for this topic!
I have a bit difficult to login as root user. I don’t know the root password. Please, what is the default password for root user?
Edit:
Sorry for this useless comment! I forgot that I taped it yesterday during CT creation.
Thanks again for the topic
Hi.
Can You elaborate how exacly You have configured nginx ?
Was this LXC from proxmox templates ?
I was using a docker container letsencrypt (SWAG) by linuxserverio. I switched to NGINX Proxy Manager awhile back because it is easier to use.
I am also trying to use NGINX Proxy Manager but i think “scratching surface” is more appropriate term then trying. Could You please point any useful article ? I cant find anything suitable.
You can check youtube or any blogs for NPM. If it doesn’t work while connected to your home wifi, it must be your router/firewall. You may need to enable hairping NAT (NAT reflection).
Also, about the Nextcloud container, I switched to the official Docker container because it is easier to update.
Hi
I tried to find a solution, but I am new to the Linux world and I searched and found this link to solve this problem, but I could not figure out the steps to solve this problem
Can you help me solve this problem?
step by step
nextcloud-container-nfs-fix
this link
https://github.com/e-minguez/nextcloud-container-nfs-fix
Regards
Hi, great article. By the way I am currently contemplating where to install nextcloud on unraid and move it proxmox lxc container. Can you tell me why you chose to move to proxmox?
Also I have a spare server, do you think it would be better to make it as backup server for unraid (if I move nextcloud here) or proxmox?
Thanks
I tried the LXC container because I thought it would be easier to upgrade. My Unraid server at the time was giving me issues and the Docker engine was an older version. In addition, I didn’t like how the Linuxserver’s Nextcloud container upgrade process. It always broke my instance. I found the LXC easy to upgrade and it was already built.
However, I migrated back to the Docker container using the official Docker container image from Nextcloud team. This is by far the easiest container to upgrade.
Hi, I install nextcloud with your LXC template.
But I use Nginx as Reverseproxy on another LXC.
My LXC Nextcloud is on 192.168.1.46 and my LXC Nginx on 192.168.1.38.
I have a free account on No-ip for dynamic dns.
When I go to my nextcloud on LAN is OK, but when I try by dynamic DNS with “XXX.XXX/nextcloud” I redirected to LAN IP, and it’s inaccessible.
I would assume the No-IP is resolving the correct public IP. Did you edit your server block of your NGINX?
Just FYI, I don’t use the LXC Nextcloud template any more because I find it hard to update. I use the official Docker Nextcloud image since it is way easier to update. If you are interested, here is the link https://www.networkshinobi.com/nextcloud-docker-container/
I haven’t a Docker installation on my little own home-server :). On my Nginx, I change LAN IP, here it’s my Nginx conf file : upstream plex_backend { server 192.168.1.30:32400; keepalive 32; } server { listen 443 ssl; listen [::]:443 ssl; server_name Xxx.xxx.xxx; ssl_certificate /etc/letsencrypt/live/Xxx.xxx.xxx/fullchain.pem; # managed by Certbot ssl_certificate_key /etc/letsencrypt/live/Xxx.xxx.xxx/privkey.pem; # managed by Certbot location / { proxy_pass http://192.168.1.41; } location /nextcloud { proxy_pass http://192.168.1.46/nextcloud; } } server { if ($host = Xxx.xxx.xxx) { return 301 https://$host$request_uri; } # managed by Certbot listen 80 default_server; listen [::]:80; server_name Xxx.xxx.xxx; proxy_buffering off; add_header X-Frame-Options SAMEORIGIN; add_header X-Content-Type-Options nosniff; add_header X-XSS-Protection… Read more »
Have you checked the official docs about the NGINX subdir? https://docs.nextcloud.com/server/latest/admin_manual/installation/nginx.html#nextcloud-in-a-subdir-of-the-nginx-webroot
I am not an NGINX expert and don’t want to confuse you. If you want to make your life a bit easier especially maintaining these services, I would say try the Docker instance and for the NGINX check out NGINX Proxy Manager.
If you really want to use LXC, I believe you can install Docker on LXC of your choice. I just haven’t done it yet and have been using a Debian VM.
wow this is amazing! thank you m