Unfortunately, my primary NAS is still on my Unraid server. My Unraid server could not mount the 4TB WD Purple drive that I have probably because I am still on version 6.5.3. Yes, it is old. There is a reason why I am still using this version because I could not upgrade my system even a fresh install refused to operate properly. But that is a story for another day.
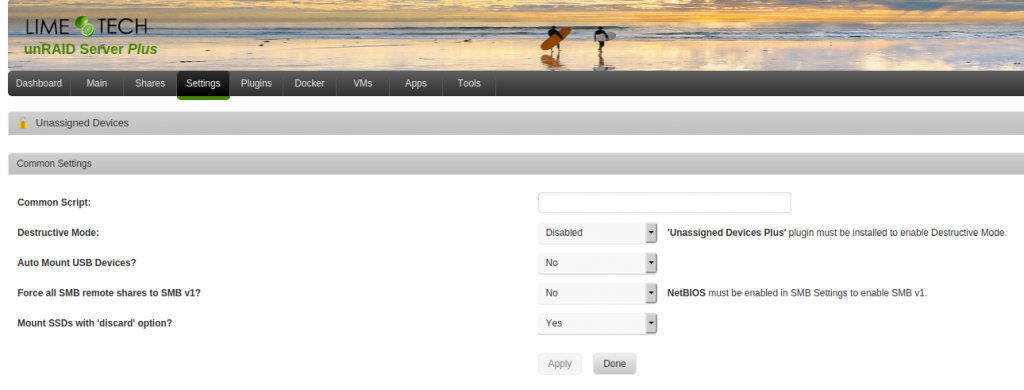
Anyways, I was trying to mount this WD 4TB Purple drive that I have laying around and to my surprised Unraid UI refused to mount the drive. Usually, it should allow me to mount, preclear and format any unassigned drives. However, this time it would not. I went to the Settings > Unassigned Devices as shown in Figure 1.
The Destructive Mode must be enabled for us to format the Unassigned drive. If you can enable this then you are done. You should be able to format any unassigned disk using the web UI. However, I could not select enable. It seems like the drop-down is greyed out for me.

Make sure to select the correct drive otherwise you might lose your data if selected one of the drives from the array. Just to make sure, check the web UI Main page > Under the Unassigned devices section. The first column is the drive as shown in Figure 2. Every system will assigned different letters sd*, so be careful.

# Select the correct Unassigned device in my case it is sdj
root@unRAID:~# fdisk /dev/sdj

Welcome to fdisk (util-linux 2.31.1).
Changes will remain in memory only, until you decide to write them.
Be careful before using the write command.

The old crypto_LUKS signature will be removed by a write command.

Device does not contain a recognized partition table.
The size of this disk is 3.7 TiB (4000787030016 bytes). DOS partition table format cannot be used on drives for volumes larger than 2199023255040 bytes for 512-byte sectors. Use GUID partition table format (GPT).

Created a new DOS disklabel with disk identifier 0x4b029bad.

Command (m for help):
- Since there is no partition, I could not delete the non-existing partition 🙂
- I selected to create an empty GPT partition table by entering
g - Now that we have an empty partition table, we need to create a new partition by entering the letter
n - I kept the default value since I want to use the entire 4TB disk. The letter
pprints the partition table - Enter
wto write the new info into the disk
Command (m for help): d
No partition is defined yet!
Could not delete partition 6568897

Command (m for help): g

Created a new GPT disklabel (GUID: 0028646D-42C1-064C-A868-36C5CF9A6C6E).
The old crypto_LUKS signature will be removed by a write command.

Command (m for help): n
Partition number (1-128, default 1):
First sector (2048-7814037134, default 2048):
Last sector, +sectors or +size{K,M,G,T,P} (2048-7814037134, default 7814037134):

Created a new partition 1 of type 'Linux filesystem' and of size 3.7 TiB.

Command (m for help): p
Disk /dev/sdj: 3.7 TiB, 4000787030016 bytes, 7814037168 sectors
Units: sectors of 1 * 512 = 512 bytes
Sector size (logical/physical): 512 bytes / 4096 bytes
I/O size (minimum/optimal): 4096 bytes / 4096 bytes
Disklabel type: gpt
Disk identifier: 0028646D-42C1-064C-A868-36C5CF9A6C6E

Device     Start        End    Sectors  Size Type
/dev/sdj1   2048 7814037134 7814035087  3.7T Linux filesystem

Command (m for help): w
The partition table has been altered.
Calling ioctl() to re-read partition table.
Syncing disks.
We are still not done. Since we cannot format the drive using the web UI, we have to do this in CLI. we are going to use the Make Filesystem command or mkfs. Let’s break this command down based on my use case.
- The command is
mkfs.xfsis a shortcut formkfs -t xfsmeaning we want the file system to be formated into XFS file system - The option
-Lmeans we have to add a label which isSURVEILLANCE - The
/dev/sdj1is the partition that we create earlier
root@unRAID:~# mkfs.xfs -L SURVEILLANCE /dev/sdj1
meta-data=/dev/sdj1              isize=512    agcount=4, agsize=244188597 blks
         =                       sectsz=4096  attr=2, projid32bit=1
         =                       crc=1        finobt=1, sparse=0, rmapbt=0, reflink=0
data     =                       bsize=4096   blocks=976754385, imaxpct=5
         =                       sunit=0      swidth=0 blks
naming   =version 2              bsize=4096   ascii-ci=0 ftype=1
log      =internal log           bsize=4096   blocks=476930, version=2
         =                       sectsz=4096  sunit=1 blks, lazy-count=1
realtime =none
At this point we are done using the CLI and we can use the UI again. The mount button should not be greyed out and we should be able to mount the disk using the web UI.
If you are having the same issues that I have with Unraid, I hope you will this helpful.
Cheers!

Thanks so much, I was going nuts why I could not format a drive I just put in my unraid server! Saved me lots of needless searching and time