
For this post, I will be using the SnapRAID, as an example, to automate its sync and scrub commands to show some use cases. Scheduled jobs can be used to do other cron jobs as well such as your own scripts. We will get to this script later on.
What is the Scheduled Jobs tab in OpenMediaVault?
The Scheduled Jobs tab is the web UI front written by the OMV devs to set basic cron jobs. A cron job is a process of job that is designed to run a specific task at certain time or period of time. Every scheduled job that was created via the web UI Scheduled Jobs is saved in the file /etc/cron.d/openmediavault-userdefined.
The Linux crontab command has three main switches. There is crontab -e, crontab -l and crontab -r. Adding job entries through the command crontab -e, the cron jobs going to be applied to the current user. The user field can be also be used. Editing the /etc/crontab will be applied system wide.
- The
crontab -ewill allow us to edit and/or add cron jobs to the crontab via the available editor such as nano and vim - The
crontab -lwill simply display all the cron jobs in standard output - The
crontab -rwill remove all the cron job entries in the table
The crontab format goes like this: * * * * * [user] [command]. The user column is optional. The first five columns (or “*”) represent time and date. See Figure 1.
# m = minute: Posible value is 0-59
# h = hour: Posible value is 0-23
# dom = day of month: 1-31
# mon = month: Possible value 1-12 or JAN-DEC
# dow = day of week: 0-6 or 1-7
#     0 or 7 is Sunday, 1-6 = Monday thru Saturday
# * = any or every
# See Figure 1

m h dom mon dow [command or /path/to/script]
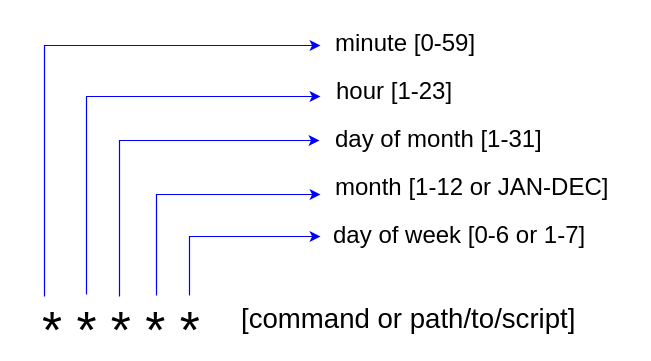
Now that we know the first five columns, I just want to say something with the asterisk (*). Every time the asterisk is used in cron job, it simply means execute from beginning thru last.
A range of value is allowed. This is done by using a hyphen, dash or minus signs between the two values. For example:
0 10-13 * * * [command or /path/to/script]

# Run the command/script every hour from 10 AM through 1 PM
A list of value is also allowed. This is done by using a comma between the values or ranges.
0 10-13,18,20 * * * [command or /path/to/script]

# Run the command/script every hour from 10 AM through 1 PM, 6 PM and 8 PM.
There is also the step value. The steps is something like every this execute the command
# If we want to run the script every 4 hours
* 0,4,8,12,16,20 * * * [command or /path/to/script]

# We can simplify the our every 4 hour using step
* */4 * * * [command or /path/to/script]

# Steps can also be used with range
# This will run from the top of the hour every two minutes through
# the first 20th minute.
* 0-20/2 * * * * [command or /path/to/script]
Now that we have a basic understanding of cron jobs, we can work on setting cron jobs using the web UI. In this case, I want to run some SnapRAID commands at certain times. Figure 2 shows that my task will run every 4 hours. The web UI is not as flexible as setting up cron jobs via CLI, but it gets the job done.
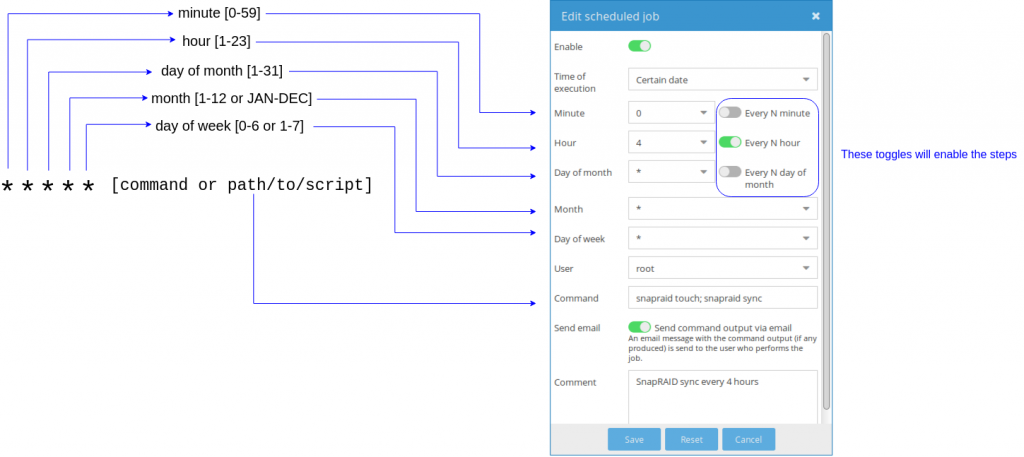
About the steps toggle as shown in Figure 2, it will take the value that is selected in the drop-down list. Therefore, if I selected 2 instead of 4 as shown in Figure 2, it would run every two hours instead of every four hours.
- Navigate to Systems > Scheduled Jobs
- Click Add
- Enabled the job if it is not enabled
- Select Certain date from the Time of Execution drop-down list
- Set the value for Minute
- Set the value for Hour
- Set the value for Month
- Set the value for Day of month
- Enable Send email for notification
- Click Save
- Click Apply and confirm
- Click Add
- Repeat all the steps for every scheduled job you would like to setup
For step 7 to work, an email notification has to be enabled. Please see this blog post in refards to enabling the email notification. This is pretty much it. Hope you will find this useful.
Cheers!
On my OMV, cron jobs entered via the GUI are found in /etc/openmediavault/config.xml
The crontab in /etc/cron.d/openmediavault-userdefined was found empty.
According to some in the Openmediavault forum, one should just do a ‘crontab -e’ on a user level (not logged in as root), this will create a temporary crontab which will be entered into the permanent one.
But this simply doesn’t work: cron jobs are not carried out.
There also seems to be a bug (https://github.com/openmediavault/openmediavault/issues/411)
I have not used OMV since version 4. I found it too much of a hassle to maintain even though it is Debian underneath. I ended up just using a plain Debian and installed the packages I needed. I installed Cockpit for web UI, but never used it.